Affiliate Disclosure: This blog may contain affiliate links. This means that if you click on a link and make a purchase, we may earn a commission. However, please note that we only recommend products and tools that we use and genuinely like. We always prioritize our readers' best interests. By clicking on these links, you won't incur any additional costs, but it will help us keep this site running. Thank you for your support!
Traducir a Español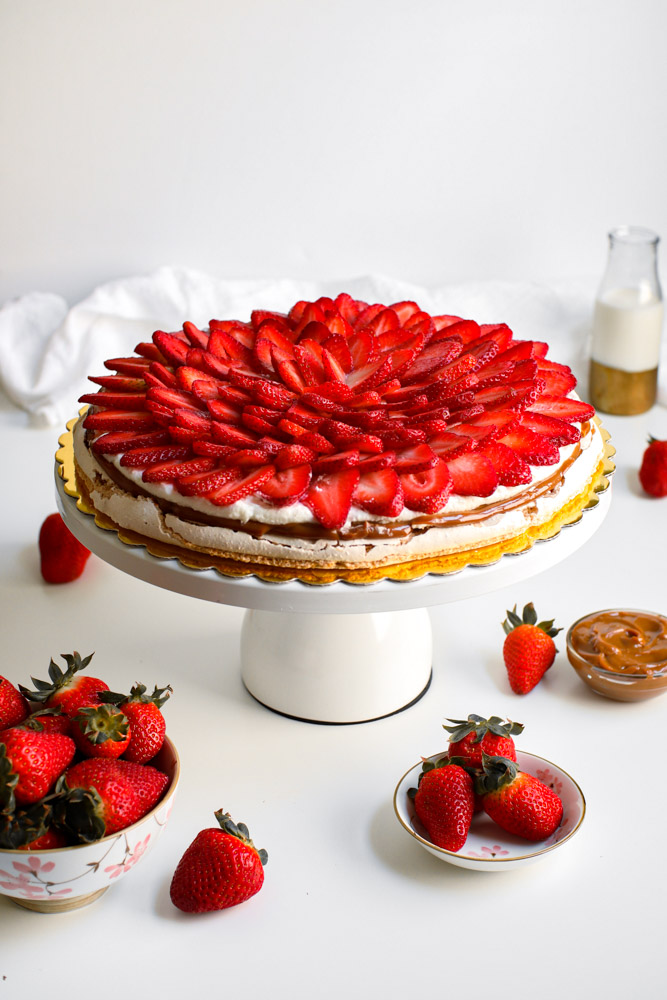
PIES – APRIL 29, 2025
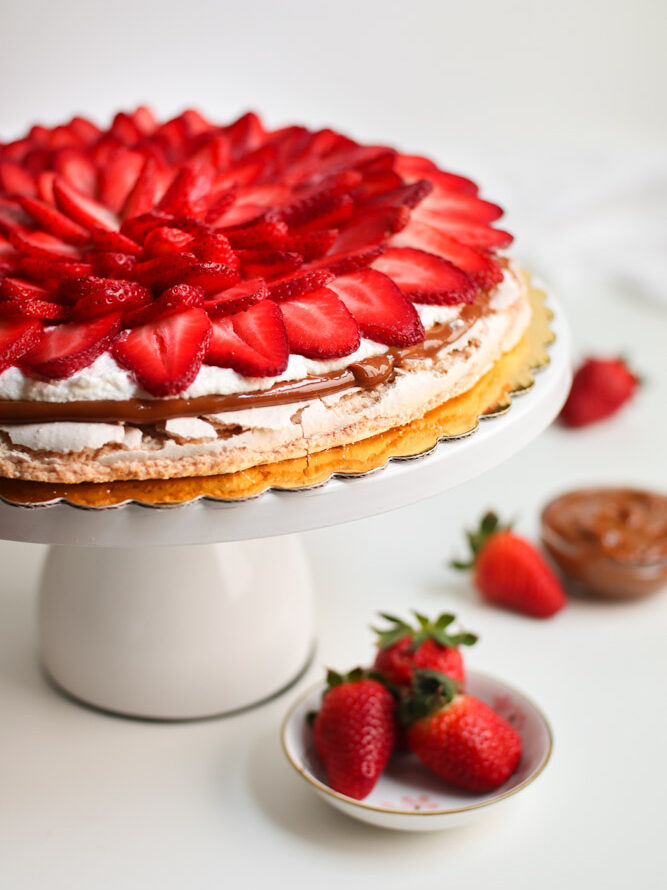
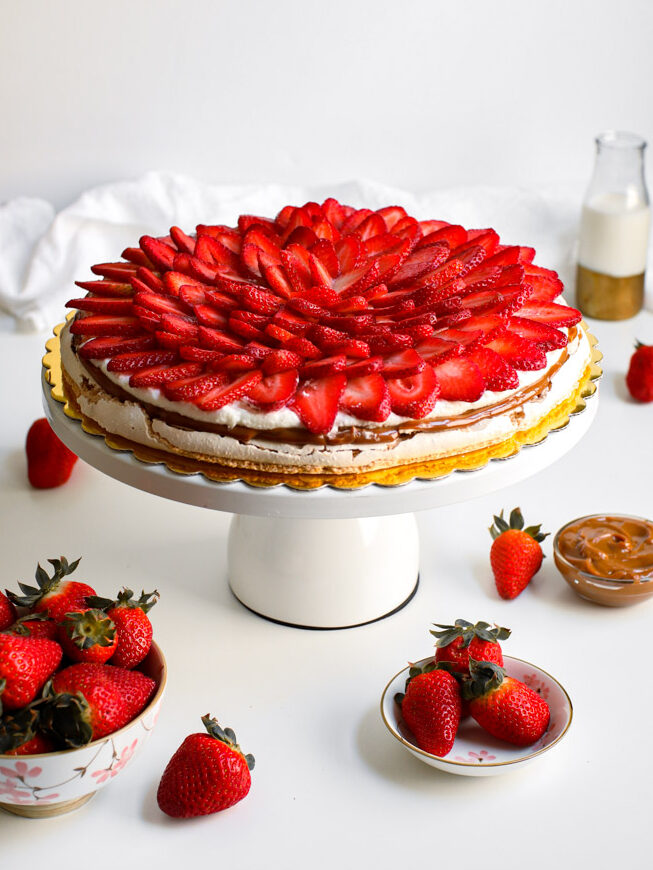
Almond Strawberry Pavlova aka. Miami Pavlova
This Almond Strawberry Pavlova combines a crisp and chewy, macaron-like base with refreshing toppings. Not your traditional pavlova, this is a favorite in Miami and the surrounding areas, where this style of pavlova has become synonymous with the word “pavlova” itself.
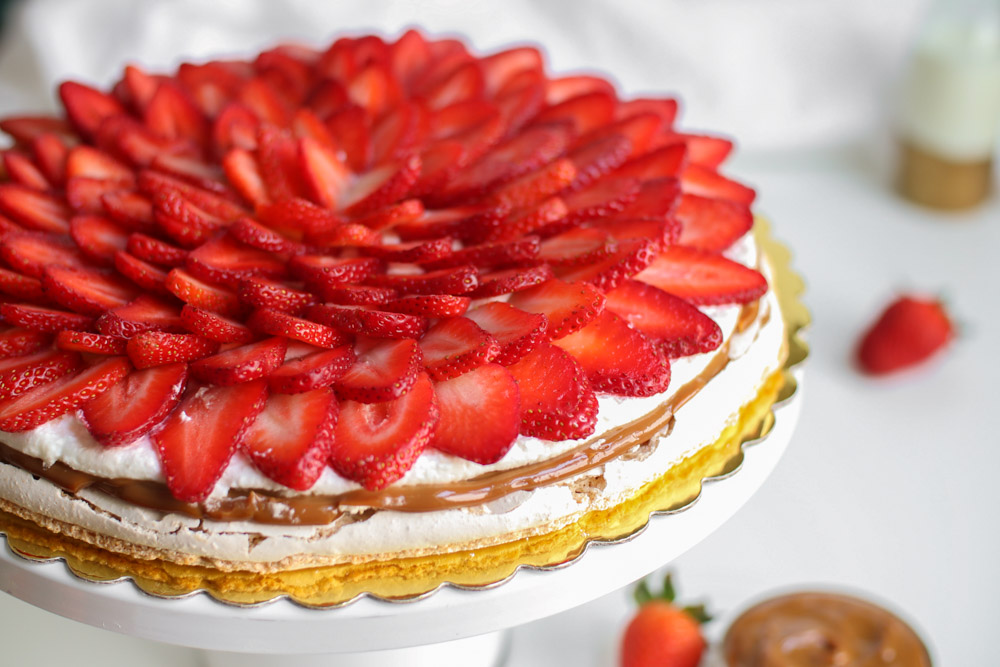
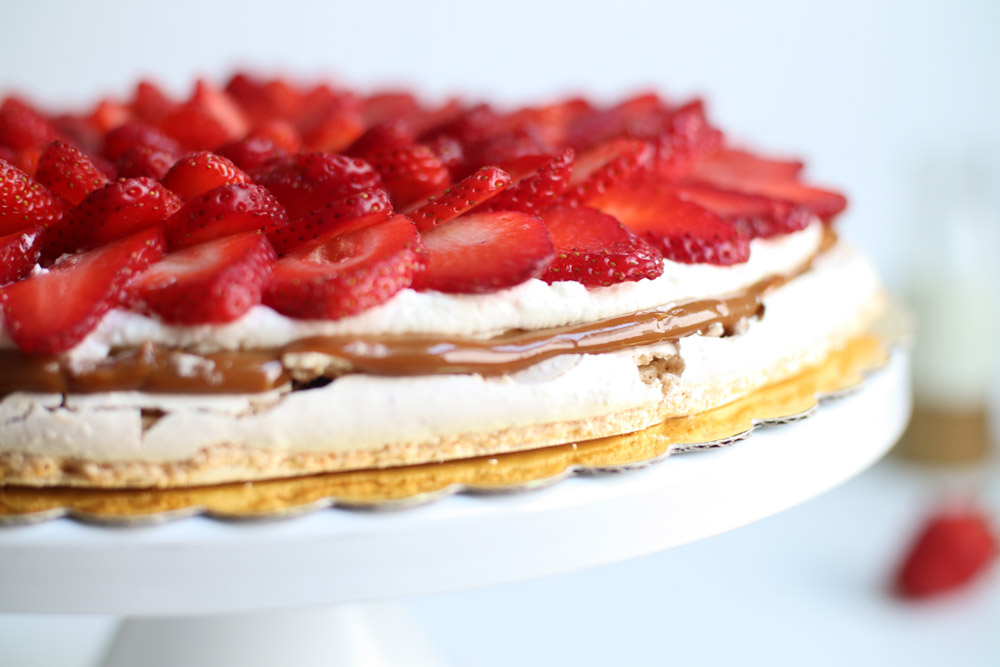
Jump to RecipePLEASE NOTE: As mentioned above, this is not your traditional Australian or New Zealand pavlova. While the classic pavlova is baked into a taller, rounder shape, offering a crispy exterior and fluffy interior and is made exclusively with meringue (without nuts), this Miami Pavlova has become the iconic version of pavlova in Miami and its surrounding areas. It gained popularity thanks to a bakery in Key Biscayne known for making the most delightful “Miami” Pavlovas. However, this version is closer to a dacquoise (meringue + nuts) than a traditional pavlova, with a crisp, macaron-like base that gives it a distinct texture and flavor.
Why will you love it?
For starters, this Almond Strawberry Pavlova (aka Miami Pavlova) is everything you want in a dessert: light, sweet, and bursting with flavor. The combination of textures is irresistible. The crisp meringue base pairs perfectly with the rich whipped cream and indulgent dulce de leche, while juicy strawberries add a refreshing burst of sweetness. Unlike the traditional pavlova, which is tall and fluffy, this version offers a satisfying crunch and nutty flavor that will have you coming back for more.
Secondly, it’s a rustic dessert, and it doesn’t need to be perfect. However, if you’d like to put extra care into it, you can create a stunning, elegant dessert that will impress everyone at your next gathering.
Additionally, the ingredients are simple and easy to find, and the recipe is straightforward if you follow the instructions. The more you understand meringues, the better your pavlova will turn out. Even if it doesn’t come out perfectly, it will still be delicious.
Lastly, this recipe can be made Gluten-free. Make sure your toppings (dulce de leche or Nutella) and almond flour of choice are completely gluten-free. For a dairy-free version, substitute the heavy whipping cream with a dairy-free option like coconut cream, and use a hazelnut spread that is dairy-free, like this one.
Ingredients to make Almond Strawberry Pavlova – aka. Miami Pavlova.
Now that you’ve learned a bit more about this type of pavlova, here are the ingredients you will need to have ready:
- Egg Whites: The foundation of your meringue base. Egg whites create the structure and volume of the meringue, giving it that light, crisp texture.
- Sugar: Sweetens the meringue and makes it crispy to balance the toppings.
- Almond Flour: Gives the meringue base a slightly nutty flavor and macaron-like texture, distinguishing this Miami Pavlova from the original.
- Whipping Cream: The rich, creamy topping that complements the meringue and adds a smooth, velvety texture. If you need a dairy-free option, you can substitute the whipped cream with coconut whipped cream, like this one.
- Dulce de Leche: This caramelized milk sauce adds a rich, indulgent flavor that pairs perfectly with the other toppings. Can also use Nutella instead. This is my favorite Dulce de Leche, and my favorite gluten-free and dairy-free hazelnut spread.
Strawberries: The quintessential fruit topping for Miami Pavlova, providing a fresh, tangy contrast to the sweetness of the other ingredients. Can use any fruit you prefer.
Tips for making the best Almond Strawberry Pavlova – aka. Miami Pavlova:
- Don’t overmix the meringue: Be sure to stop whipping as soon as you reach stiff peaks. Overmixing can cause the meringue to become dry and brittle.
- Control your baking time: The meringue base should be baked low and slow at 300°F for the perfect crisp exterior and soft, chewy center. Keep an eye on it to avoid overbaking.
- Use a piping bag for easy spreading: When adding the whipped cream and dulce de leche, a piping bag makes it easier to control the placement without smashing your meringue.
- Serve immediately: This dessert is best served fresh, as the meringue can soften over time. It’s perfect for a show-stopping treat at any gathering!
- Use grams instead of cups: proportions are essential for the meringue, and incorrectly measuring an ingredient will give you inconsistent results. If possible, use a scale and the measures in grams listed below.
Almond Strawberry Pavlova – aka. Miami Pavlova
Ingredients
Meringue Base ingredients:
- 125 gr egg whites at room temperature approximately 4 egg whites
- 250 gr granulated sugar 1 ¼ cup
- 1 tsp vanilla
- 125 gr almond flour approx. 1 ¼ cup
Topping Ingredients:
- 200 gr heavy whipping cream ¾ cups
- 20 gr powdered sugar approx. 3 tbsp
- 380 gr dulce de leche 1 13.4oz can can substitute for Nutella.
- 500 gr Strawberries sliced or more as needed about 3 cups
Instructions
Meringue Base Instructions:
- Preheat your oven to 300°F and line a baking sheet with parchment paper or a silicone mat. For precision, you can draw an 8-inch circle on a piece of paper and place it under the parchment to use as a sizing guide. Be sure to remove the paper before baking!
- In a heatproof bowl, or the bowl of your stand mixer set over a pot of simmering water (making sure the bowl doesn’t touch the water), combine the egg whites and sugar. Whisk constantly until the sugar dissolves and the mixture reaches 50°C on a thermomether (you can also rubbing a bit of the mix between your fingers, if you no longer feel sugar granules then it's ready).
- Transfer the bowl to a stand mixer and whisk on medium-high speed for 8-10 minutes, or until stiff peaks form.
- Gently fold in the almond flour and vanilla until just incorporated. Be careful not to overmix.
- With a spatula or a spoon, spread the mixture into a circle, aiming for an 8-9 inch diameter. You can eye-ball it and spread until it's just about ½ to 1 inch tall. See notes below on size.
- Bake for 40-45 minutes if you're using an 8-inch circle, or adjust the time based on the size of your meringue. The meringue will look set and still pale. It should be dry to the touch and have not begin to brown yet.
Topping instructions:
- While the pavlova is baking, chill your mixing bowl and whisk attachment in the freezer for 10-15 minutes. Meanwhile, wash and slice the strawberries, then place them in a colander or flat plate, lined with paper towels to drain.
- Once the bowl and whisk are chilled, place them in your stand mixer and add the whipping cream. Begin mixing on medium speed.
- Gradually add the powdered sugar while mixing, until the cream reaches almost stiff peaks. Do not overmix or it will curdle and turn into butter.
- Refrigerate the cream until ready to use. NOTE: For easier spreading and to avoid smashing your pavlova, you can place both the whipped cream and dulce de leche into separate piping bags. This allows for smooth application without smashing your meringue base. If you don’t have a piping bag, you can spread them gently on the pavlova with the back of a spoon.
Assembling the pavlova:
- Cool the meringue base completely before topping.
- Using a spoon or piping bags, add a generous layer of dulce de leche or Nutella, spreading well and leaving about ½ ½-inch gap from the edges.
- Next, layer the whipped cream, leaving a bit of a gap between the edge of the dulce de leche to show the layers.
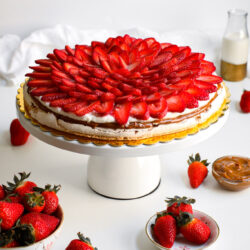
- Lay strawberries one at a time, slightly overlapping the other, as you see in the pictures. You can also use blueberries or any fruit you prefer and lay them in any pattern your heart desires.
- Serve immediately. This dessert is best served fresh, as the meringue can soften over time. Keep leftovers refrigerated and consume within a day or two.
Notes
- The taller your meringue, the chewier the texture will be. A thinner meringue will result in a crispier pavlova.
- Your meringue base may deflate slightly when removed from the oven, and some cracking may occur. Don’t worry—this is completely normal! The cracks will be covered by the toppings and won’t affect the flavor at all.
- Some meringue bases have crushed walnuts instead of almond flour. Use what you prefer, though I highly recommend the taste of the almond ones, as it turns out like a giant macaron.
- How much Dulce de Leche, Whipping cream, and strawberries you end up using depends on a lot of factors, but the listed should cover it at least. If you like more dulce de leche and whipped cream, feel free to go to town with it and add more. If your strawberries are gigantic and the slices cover too much of the area, you may end up using less, or if you overlap them too tightly, you may end up needing more. Use common sense while arranging your toppings.
Recipe adapted from Anna Pasteleria.